Before creating an AZURE account I would like to give a brief introduction to what exactly is Microsoft Azure.
Microsoft Azure, often referred to as Azure is a cloud computing service operated by Microsoft for application management via Microsoft-managed data centers. It provides software as a service(SaaS), platform as a service(PaaS) and infrastructure as a service(IaaS) and supports many different programming languages, tools, and frameworks, including both Microsoft-specific and third-party software and systems.
Azure, announced at Microsoft’s Professional Developers Conference(PDC) in October 2008, went by the internal project codename “Project Red Dog”, and formally released before being renamed to Microsoft Azure on March 25, 2014.
What is the Azure free account?
The Azure free account includes free access to popular Azure products for 12 months, $200 USD credit to spend for the first 30 days, and access to more than 25 products that are always free. This is an excellent way for new users to get started and explore. To sign up, you need a phone number, a credit card, and a Microsoft or GitHub account. Credit card information is used for identity verification only. You won’t be charged for any services until you upgrade.
Azure purchasing options
With flexible purchasing options, you can choose the option that works best for you. Use one of the following three ways to buy Azure:
- Azure.com: Buying directly through Azure.com is the fastest and easiest way for organizations of all sizes to get started with Azure. You can manage your Azure deployments and usage yourself and get a monthly bill from Microsoft for the services used.
- Microsoft representative: Buying Azure through a Microsoft representative is intended for large organizations or customers who already work with one. You’ll also manage your Azure deployments and usage yourself and get a monthly bill from Microsoft for the services used.
- Microsoft partner: If you buy Azure as a managed service through your partner, your partner will provide you with access to Azure, manage your billing, and provide support.
To create and use Azure services, you first need to sign up. If you’ve never tried or paid for Azure before, you can sign up for the Azure free account.
You’ll need a valid credit card to create your Azure free account. This card is used for identity validation only. Your card won’t be charged until you choose to upgrade.
Sign up for a free account
- In a web browser, go to https://azure.microsoft.com/free.
- Scroll down through the page to learn more about the benefits and free services available.
- Select Start free.
- Sign in with your Microsoft or GitHub account or create a free Microsoft account.
- On the About you page, select your correct country or region. Enter your first and last name, email address, and phone number. Depending on your country, you might see additional fields, such as a VAT number. Select Next to continue.
- On the Identity verification by phone screen, select your country code, and type the number of a telephone to which you have immediate access.
- You have the option of text or callback to obtain a verification code. Select the relevant button, type the code in the Verification code box, and select Verify code.
- If the verification code is correct, you’re asked to enter details of a valid credit card. Enter the card information and select Next.
- The last step is to review the agreement and privacy statement then select Sign up.
Congratulations! You have successfully set up a free account, and should be on the Azure portal home page.
Understand Azure billing
With Azure, you only pay for what you use. You’ll receive a monthly invoice with payment instructions provided. You may organize your invoice into line items that make sense to you and meet your budget and cost tracking needs. You also can get set up for multiple invoices. Let’s take a look at how this works.
Azure subscription
When you sign up, an Azure subscription is created by default. An Azure subscription is a logical container used to provision resources in Azure. It holds the details of all your resources like virtual machines (VMs), databases, and more. When you create an Azure resource like a VM, you identify the subscription it belongs to. As you use the VM, the usage of the VM is aggregated and billed monthly.
Create additional Azure subscriptions
You might want to create additional subscriptions for resource or billing management purposes. For example, you might choose to create additional subscriptions to separate:
- Environments: When managing your resources, you can choose to create subscriptions to set up separate environments for development and testing, security, or to isolate data for compliance reasons. This is particularly useful because resource access control occurs at the subscription level.
- Organizational structures: You can create subscriptions to reflect different organizational structures. For example, you could limit a team to lower-cost resources, while allowing the IT department a full range. This design allows you to manage and control access to the resources that users provision within each subscription.
- Billing: You might want to also create additional subscriptions for billing purposes. Because costs are first aggregated at the subscription level, you might want to create subscriptions to manage and track costs based on your needs. For instance, you might want to create a subscription for your production workloads and another subscription for your development and testing workloads.
You might also need additional subscriptions due to:
- Subscription limits: Subscriptions are bound to some hard limitations. For example, the maximum number of Express Route circuits per subscription is 10. Those limits should be considered as you create subscriptions on your account. If there is a need to go over those limits in particular scenarios, then you might need additional subscriptions.
Customize billing to meet your needs
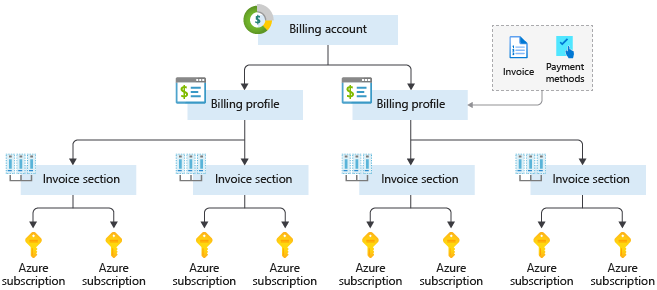
If you have multiple subscriptions, you can organize them into invoice sections. Each invoice section is a line item on the invoice that shows the charges incurred that month. For example, you might need a single invoice for your organization but want to organize charges by department, team, or project.
Depending on your needs, you can set up multiple invoices within the same billing account. To do this, create additional billing profiles. Each billing profile has its own monthly invoice and payment method.
The following diagram shows an overview of how billing is structured. If you’ve previously signed up for Azure or if your organization has an Enterprise Agreement, your billing might be set up differently.